Quantcast
Channel: BZ's BMW Isetta 300's
Viewing all 104 articles
Browse latest View live

Renault Twizy

$
0
0

Click on either photo to go to an article in the NYT's about the Renault Twizy. The Twizy is a new electric microcar produced by Renault and manufactured in Spain. It has a top speed of 50mph and a battery range of 62 miles. Naturally it's not available in the US, but close to 8,000 units have already been sold in Europe by September 2012. Starting price is around $9,800.00 not including battery lease.


Click on this photo to go to a YouTube video of the Twizy in action.

Isetta - Previous Life

$
0
0
Recently the original owner of my Isetta's visited to see the latest progress. She brought some more slides she had found of when her and her husband owned and drove the cars. These slides are from a 1960 visit to the Harry S Truman Presidential Library in Independence, MO.


These pictures were taken several years before I was born, but I immediately recognized the location. My parents owned a business one block east of the Howard Johnson's, so during the 70's I remember often eating at this location and getting gas with my dad at the Standard station that is in the background.

Isetta - Fadex Press Release

Csepel Danuvia 125 - Owners Manual

$
0
0
Here's something I was really happy to find. It's a Csepel Danuvia 125 Owner's Handbook and Parts Catalogue in English! Most everything I've found for my Csepel has been in Hungarian and required me spending lots of time typing text into google translator. Now if I could only find a manual for my Bajaj three wheeler.


Isetta - Misc. Updates

$
0
0


I now have my hi/low beam and turn signal switches installed.


The Isetta's wiring diagram is a little vague about which terminals each wire is connected to, so I found myself referring to pictures I had taken while disassembling the car for help rewiring the switches. 


The left switch is the hi/low beam which has three wires running to it. The top two terminals get the yellow (71) and white (73) wires.


The bottom terminal gets the yellow/white (72) wire.


The right switch is the turn signal switch which has six wires running to it. The top side terminals get the blue/yellow (78), grey/black (57), and green/black (58) wires.


The bottom side of the switch gets the red/black (79), green/white/black (80), and red/white/black (81) wires


You can see the wires going to the switches are all slightly different lengths. This is pretty important, because there is not much room inside the housings to have any excess wire. I probably had my switches on and off three or four times tweaking the lengths of the wires so that everything fit in the housings neatly.


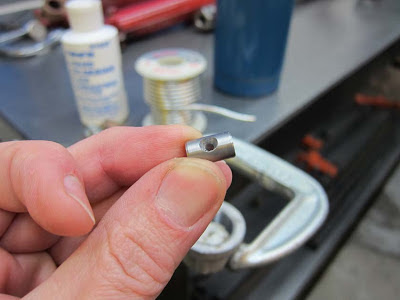
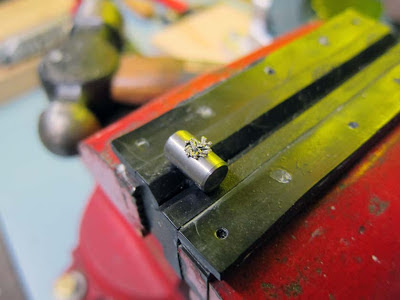
I can't remember where I read it, but if you need to replace the plastic sleeve between the housings for the switches, there is an easy fix available at virtually any hardware store.


All you need is a 1-1/2" diameter plastic flanged tailpiece for a drain. I picked this one up for under $2.00.


Next all you need to do is to cut it to the correct length and then make a vertical slit in it and voila!


I've also finished connecting the wiring from the dash to the terminal block on the wheel well.


I've also installed the speedometer cable. 


I also recently installed the front stone guards and mud flaps.


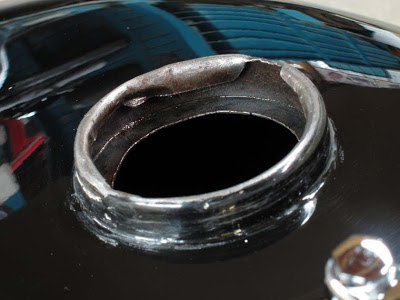
The stone guards I purchased didn't exactly lay down flat on the curve of the Isetta's body and the holes didn't quite line up with the holes that were pre-punched in the mud flaps. If the stone guard laid flat on the contour of the body, it would be easy to mark the location of the holes that need to be drilled, but since it didn't lay flat, I had to do a screw at a time gradually pulling it flat against the body. I found there was an order of drilling the holes that worked best to prevent creating spots where the stone guard did not pull tight against the body. Hole number 1 should already exist in the wheel well of most Isetta's. I started with attaching the stone guard and mud flap at this point on the inside bottom of the wheel well. I next positioned the stone guard and mud flap in the approximate correct position on the wheel well and marked the mud flap where holes needed to be punched. After punching new holes in the mud flap, I reattached the stone guard and mud flap with screw number 1. I then adjusted it to the correct position on the wheel well and drilled hole number 2. After installing screw number 2, I pressed the stone guard flat against the body and drilled hole number 3 and installed the screw pulling it flat against the body. I then repeated the process with holes 4 and 5. 


One other thing I would recommend when drilling holes in sheet metal are Unibits which are also referred to as stepped drill bits. Unibits are the absolute best for drilling clean holes in thin sheet metal. They're also great for enlarging existing holes. This is a small metric size Unibit in 1mm increments up to 12mm, but they are commonly available in many sizes that can drill holes as large as 1-3/8". 

Bruce Weiner Microcar Auction

$
0
0

If you haven't heard, The Bruce Weiner Microcar Museum is closing it's doors and auctioning off the entire collection without reserve on February 15-16, 2013. I'm really sad to see the museum close, but if you've got some spare cash and love microcars, this will be the opportunity of a lifetime. In addition to the auction, RM Auctions is publishing a full color catalog with over 800 photos which is available for purchase. You can learn more about the auction by visiting the museums website. I'm hoping Bruce keeps the website up for the museum after it closes as a testament to what a great collection he acquired and generously shared with microcars lovers from around the world. 

Floyd Clymer Books

$
0
0

I recently picked up a couple of very good vintage Floyd Clymer motorcycle books. Even though they're about motorcycle engine maintenance and repair, there is tons of useful  information that would apply to microcars as well as motorcycles. I give both of these books two thumbs up!

Isetta - Winter Weather

$
0
0
We're having our first blast of winter weather in Kansas City, so I thought it appropriate to post a picture the previous owner of my Isetta's provided me with. This picture is from the winter of 1966.

Bajaj Tristar Brochure

$
0
0


I've been surprised how hard it is to find a manual or information on the Bajaj three wheeler I bought awhile back. Even finding pictures online has proven difficult. I was corresponding with a person in India about parts recently and he told me he had never seen the version of the Bajaj I have in India and that it must have been made specifically for the export market. I did recently find this brochure from Bajaj America. Even though it's only a sales brochure it did provide me with some basic information about my Bajaj. For one, I didn't know it was called a Tristar. The brochure also list the specifications for the various models that were offered, so I was able to figure out which model I had and the specifications for my model. 

Bajaj Service Manual

$
0
0
What a great end to the year! I've been having a very difficult time locating an owners manual or service manual for my Bajaj and today one I found on ebay arrived in the mail. It's not for the exact model I have. It's for the FE (Front Engine). I have a  RE (Rear engine), but the manual is for 2-stroke engines like mine, and it's approximately from the same time period. Even though it's a FE manual, most of the information is applicable to my Bajaj. FE or front engine is somewhat of a misnomer. The engines on FE's is more of a mid engine located slightly underneath and behind the driver. The main difference between the FE and RE is on the FE the power is transmitted to the rear wheels via an enclosed chain drive. On the RE's the power is transmitted to the rear wheels directly by drive shafts. Much to my delight, this is a very comprehensive manual intended for repair shops that serviced these vehicles. I think pretty much any information I'll need restoring my Bajaj is in this manual. 


More coming soon........

Happy New Year !!!

Soldering Control Cables

$
0
0
It's been bothering me that my Csepel's clutch cable was a tad too long and as a result the adjuster screw was not properly threaded into the mount on the engine. It was bothering me enough that I finally decided to fix it. The items I used to accomplish this were a propane torch, liquid soldering flux (hydrochloric acid based), silver bearing solid solder, a file, cable cutters, ball peen hammer, and a simple home made soldering pot.


I experimented with using a soldering iron but found the most effective way is to make a simple soldering pot. For my soldering pot I used a cap that is intended for 3/4" pipe. I cut up small pieces of solder and placed them in the cap and then heated the cap until the solder became molten. 


The next step was to dip the end of my cable into the liquid soldering flux and then into the molten solder. I've seen this referred to as tinning the cable.


The cable barrels on my Csepel are a size I couldn't find, so I ended up making my own barrels. These are 7mm in diameter and 12mm in length. I drilled a hole sized for the 2mm cable I'm using, and I also countersunk the hole.


I then inserted the cable into the barrel so that about 2mm was protruding and clamped it in a vice with rubber jaws as not to damage the cable.


I then used a ball peen hammer to smash or mushroom out the end of the cable.


After peening the end of the cable, I slid the barrel back and dipped the end of the cable in soldering flux again. I then slid the barrel back to where it is suppose to be and dipped the end of the cable and barrel into the molten solder a couple of times. It looks a little crude in this photo, but will easily clean up with a little filing.


The soldered cable end after cleaning up with a file. 

Isetta - Imperial Whiskey Ads

First Csepel Ride of 2013

$
0
0
In my last Csepel Danuvia update back in November of 2012 I had installed new clutch friction plates. Before I put the gear oil back in the bike, I thought I'd pour it through a strainer just to make sure there weren't any stray pieces of the broken bakelite plate somebody had used as a shim. Well there was no bakelite, but there was a 5mm ball bearing. Somehow while I was replacing the friction plates the ball bearing that is between the clutch throwout rod and spindle had came out without me noticing. I had to take the clutch apart one more time to replace the ball bearing. Wouldn't be a big deal, but the clutch springs are kind of a pain to install on this bike. 


After finally getting my clutch issues resolved and the bike back together, in anticipation of getting the bike inspected and licensed this spring I added an original Csepel squeeze bulb style horn. I also added an Albert style NOS Bumm mirror. I really like the minimalist stripped down look of this bike but I needed the horn for it to pass inspection and for my own safety I wanted a rearview mirror. 


I was thinking I probably wouldn't be able to get the bike out until early spring but last Friday we had an unbelievably warm day in KC. It hit the mid 60's which is quite unusual for the middle of January. I took advantage of the warm day by taking the Csepel to KC Brake for an inspection needed for licensing the bike. KC Brake is right down the street from me and the owner is a vintage bike aficionado and host a big get together each year the weekend of the Heart of America Motorcycle Enthusiast Show in KC. After the inspection I stopped by a friends gallery/studio. My friend Dale suffers from the same problem I have. Our studios are being taken over by vintage vehicles. When Dale isn't making furniture he likes building and working on cafe racers. He had never seen the Csepel running so I thought I'd stop by for a demo. I'll keep my fingers crossed, but the Csepel seems to be running real good!! 


One other little change I had made before my ride was the spark plug I was running. I found an old Champion spark plug application chart for motorcycles  on a website called www.oldengine.org that had my bike listed on it. The chart recommended a Champion L-10 which I cross referenced to a NGK B6HS. I was running a NGK B8HS and wouldn't have thought it would have made that much difference, but the bikes starts much easier and runs better on the NGK B6HS.

Second Csepel Ride of 2013

$
0
0
On my first ride of the year, one little problem I had that I wanted to resolve before I rode the bike again was the gas cap was leaking. As you can see in this photo the inside lip is mangled and the top edge of the opening is uneven, creating a situation where the gas cap will not get a good seal. I wanted to try to straighten  the inside lip so that the cap would fit tighter, but I didn't have any kind of plier that could get in there and do it. I tried adding another rubber gasket, but I still couldn't get the cap to cinch down tight enough to get a good seal. A thicker soft gasket tape might work, but I don't know how long it would last in an application like this.


I came up with another solution. I turned a little cup out of a plastic called Delrin on the lathe. It fits through the larger opening but has a lip with a rubber seal that prevents it from dropping through the smaller inner opening. It also has a few vent/drain holes drilled in it.


Here you can see it dropped into the opening. It had to be a cup shape to accommodate the way the underside of the gas cap protrudes into the opening.


The last little addition is a spring that holds the Delrin cup tight in the opening when the gas cap is put on. This seems to have worked pretty good. On my second ride I filled the tank up pretty full and I didn't have any leakage whatsoever.


Another beautiful January day can only mean it's time for another ride, and this ride was much better than my last because I didn't have gas leaking out of the cap every time I hit a bump!  I've been wanting to get some photos of the bike outdoors, so I rode it over to KC's Kauffman Performing Arts Center which is just a few blocks from me for an outdoor photo op.


Mazda T360 Brochure

$
0
0


I want one, but since I know I'd never find one of these in the US, I'd be perfectly happy to find a Subaru Sambar truck. This brochure came out of a nice book my wife brought back from Japan for me about the history of Japanese trucks and commercial vehicles. 

Bruce Weiner Microcar Museum Auction Catalog

$
0
0
Something exciting came in the mail today!


It's the catalog for the Bruce Weiner Microcar Museum auction.


To call it a catalog is a little bit of an understatement. It's more like a hardbound 800+ page full color encyclopedia of microcars. Without a doubt, the nicest microcar book ever published.


While it's sad to see the museum close, what a beautiful memento of the finest collection of microcars ever amassed in one location.


The catalog is available for purchase from RM Auctions or you can download the entire catalog for FREE as a 35MB PDF by clicking on the above photo.

Isetta Interior Panels - Part 2

$
0
0

I'm finally getting back to work on the Isetta. These are the two original interior side panels. Not in the best shape, but I'm glad they're still with the car so that I have something to work from making my reproduction panels. In the bottom photo you can see how the right (passenger) side panel is all scratched up. This happens when you take the seat in and out of the Isetta. It's a very tight fit, and the frame of the seat tends to scratch the right side panel. To avoid damaging my new panels I'm going to use a thin sheet of something to protect it when I remove or replace the seat.


The first step was to trace the original panels onto my panel board. Since the original panels were a little damaged in areas, I needed to go back and clean up my pencil lines to what I thought was close to the original shape. I used an utility knife to cut the straight edges and I roughed out the curved lines on my bandsaw.


I used a spindle sander and some hand sanding to get the curved lines to their final shape. 


The two side panels after sanding them to their final shape.


I am bonding the vinyl to the panel board the same way I did with my rear parcel shelf panel using wood glue and a vacuum press. The panel and vinyl will be squeezed between two sheets of MDF with vacuum pressure. In this photo I'm preparing the cover sheets so that the vacuum pressure is applied evenly across the panel.  The next step will be to roll out the glue on the panel.


After I rolled out my glue on the panel board, the vinyl is placed on top and as soon as I put my top MDF cover sheet on top of the vinyl, it's ready to go in the vacuum press.


This is the whole stack inside the vacuum bag.


After a few hours, I removed the stack from the vacuum bag. In this photo I've flipped the panel over so you're seeing the backside of the panel and vinyl. You can also see the parchment paper I placed underneath the panel while it was being pressed. The reason I did this was if there was any glue that squeezed out, the panel would not be stuck to the bottom sheet of MDF.


The next step was to draw a line around the perimeter of the panel board and trim off the excess vinyl.


The excess vinyl was pull tight over the edge of the panel board and glued to the backside using a hot melt glue gun.


The front of the passenger (right) side panel after rolling over and glueing the vinyl.


The next step was to glue the windlace around the wheel well part of the panel.


The installed passenger side panel. Next up, the driver side panel.

Isetta Velam Brochure

Isetta - Gas Cap

$
0
0
An original gas cap for the German made Isetta's. The material is bakelite with a painted aluminum emblem.
Viewing all 104 articles
Browse latest View live